Tor proxy 101

|
I realize I haven’t published for a while again, this new blog entry aims to inaugurate the new Tor version of my website that you can easily find if browsing through Tor or head to the Privacy Policy section of this blog. In this blog post, I will shortly explain what the Tor network is, why it matters, and why every website should run a .onion version. Then on the second hand, I’ll describe step by step how anyone can create a Tor proxy of their favorite website using a cheap VPS.
As I consider this post important, I took the time to translate it in both English and Dutch.
What is the Tor network
I’m sure most of my Tech-savvy readers already had the curiosity to download a version of the Tor browser based on Firefox and browse a couple of .onion websites. If you did, probably you have found the browser slow and unable to browse many common websites, such as Google, due to the most inhuman captcha you can think of.
But why is the Tor browser so slow? It’s because it uses another encrypted and zero-trust network on the top of the application layer (aka HTTP), this network is called a Tor-circuit. Every time you initiate a Tor connection, you are routed through a set of onion servers, or nodes in a more modern blockchain-hyped manner. To briefly summarize there are 4 types of onion servers as outlined on the below image:
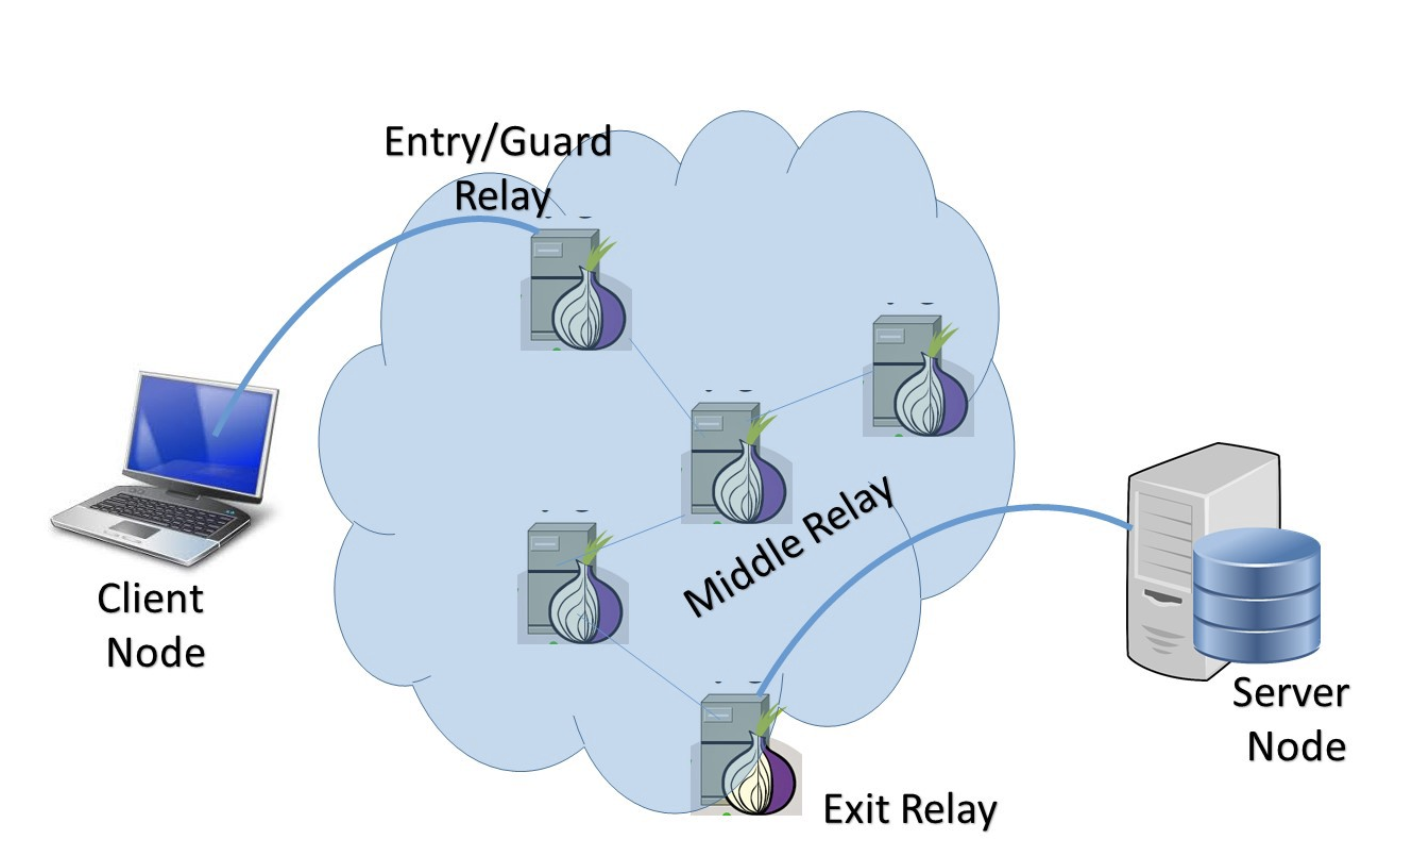
- Entry relay node: First relay node in the Tor circuit. As such, they see the client identity and could be targeted by external attackers. They are publicly known and listed on the Tor project website, also easy to block and censor.
- Middle relay node: Intermediate hope that pass encrypted data within the network, they only know descending and ascending nodes and may connect to both an Entry or Relay node.
- Exit relay node: These nodes act as bridges between the Tor network and the Internet. Exiting traffic is seen on a clear net website as coming from these nodes. Also, they are publicly known and frequently tagged by most online web service and security teams.
- Bridge relay node: Entry relay node that isn’t publicly listed on the Tor project website, as such they are harder to block by ISP and governments and fit pretty well, and are very convenient for an individual on a Business strip in countries you wouldn’t visit for tourism.
In a traditional Client-Server HTTP connection, they both need to mutually authenticate to have the server send data to the client. During the connection to a Tor Hidden Service, the server and the client communicate over an intermediate rendez-vous point in the network, so no information is directly transmitted. This is important as it prevents the recording on the server of personally identifiable data such as User-Agent or IP address.
Why does it matter
To summarize, because the communication happens indirectly over an encrypted network, the server’s or client’s IP address cannot be determined, which makes censorship quite difficult 1. One could argue that the experience of accessing a clearnet website over Tor is similar. However, by doing so, you increase the risk of DNS leak and furthermore, you should consider that a significant part of Tor Exit nodes is run and monitored by intelligence agencies and other malicious actors that may be prompt to intercept and decrypt your traffic whenever possible.
As such, providing a Tor proxy for every clearnet website is the best way of guarantying a standard experience to your users in even the most strictly censored countries.
Before starting to dive into the technical implementation, I would like to highlight here that I provide some handy links on my blog to navigate over the onion world here.
Get a VPS and run a Tor Hidden service
Alright, let’s have this proxy done. First, you need to acquire a cheap VPS to run the Tor server software, I recommend a VPS rather than doing it from your home connection as the network output is usually greater and more stable than at home, plus you don’t have to deal with a dynamic IP. Also, you’ve probably heard that Cloud providers don’t like hosting Tor servers in their Clouds, but this mainly applies to Exit nodes which can be at the root of illicit activities coming from their network such as DDOS attacks or spam campaigns, other kinds of nodes are usually not an issue.
If you don’t already have a favorite Cloud provider, you can find a cheap one or Lowendbox or register in DigitalOcean with my referral link and enjoy $100 credits for the 60 first days while giving me $25 credit to run this proxy. I let you refer to this tutorial to properly harden your machine.
Once logged in the VPS, install the Tor software, for the rest of this tutorial I use a Debian v9 (stretch) box:
apt update
apt install tor
Note that Debian official Tor package is late behind the current release, so you will need to add the official package list maintained by the Tor project team to your apt sources list file, see the following tutorial.
This is quite important as the version 2 of the Tor server software only support Hidden services v2 that won’t be relayed by the network in a future Tor release, see the below announcement on Twitter:
With onion services v3 standing strong, it's time to retire v2. The internet has around 15 months to transition from v2 to v3 once and for all. Read the full deprecation timeline on our blog: https://t.co/iA1ZNvmxIa pic.twitter.com/bDzNSr2Npt
— The Tor Project (@torproject) July 24, 2020
Now configure the hidden service in /etc/tor/torrc under This section is just for location-hidden services by uncommenting/rewriting the following lines 2:
HiddenServiceDir /var/lib/tor/hidden_service/
HiddenServicePort 80 127.0.0.1:3000
This creates a Tor hidden service in the hidden_service folder and streams it to localhost on port 3000. If you don’t use at least version 4 of the Tor software, add the option HiddenServiceVersion 3 as version 2 will soon reach EOL. Optionally, you can add some logging for troubleshooting:
SafeLogging 0
Log notice stdout
Log notice file /var/lib/tor/hidden_service/hs.log
Log info file /var/lib/tor/hidden_service/hsinfo.log
Now launch the Tor service to automatically create the new hidden service with a .onion domain name linked to a public/private key pair.
service tor start
While the domain name of a Tor hidden service doesn’t matter as much as the one of clearnet website, you may want to backup the public/private key pair in /var/lib/tor/hidden_service/ for later recovery. Finally check the Tor service started normally in the system log events:
tail -30 /var/log/syslog
Setup a simple Expressjs proxy
Now the proxy part, I firstly fell on this interesting Github repository, while this does work, the first thing I’ve noticed is a big REQUEST IS DEPRECATED warning as soon as I run the script. This forward you to an nice to read Github issue thread but which doesn’t propose any ready-to-use alternative to the request().pipe(response) javascript streaming method.
Those last two years, I wrote much more ppt than lines of codes. I was also looking for a simple and well-maintained package and finally found this perl based on the http-proxy NodeJS library. It makes this proxy server code literally fit in 5 lines!!3
Alright, now let’s install the latest nvm and NodeJs LTS version (12.18.1 at the time of this post):
curl -o- https://raw.githubusercontent.com/nvm-sh/nvm/v0.35.3/install.sh | bash
#Check the latest NodeJS LTS version:
nvm ls-remote
nvm install 12.18.1
#Make the latest NodeJS LTS version the default one:
nvm alias default 12.18.1
nvm use defaut
To simplify the task, I’ve created a ready to clone Github repository, so you can just download it, modify the index.js file, and proxify your website.
apt install git
git clone https://github.com/ArisBee/http-proxy.git
cd http-proxy/
npm install
Now add the clearnet version of your website in the index.js file as below:
// We load the express package
const express = require("express");
// We create an express app
const app = express();
// We create a proxy object based on the http-proxy-middleware package and class
const { createProxyMiddleware } = require("http-proxy-middleware");

// Our app input stream a target website, change the target to your convenience
app.use(
  "/",
  createProxyMiddleware({
    target: "https://aristidebouix.cloud",
    changeOrigin: true,
  })
);
// Our app can be accessed on localhost port 3000 which is our hidden service
app.listen(3000);
Of course, you could improve with some error handling, but I keep it short for the purpose of this article. Ultimately, you can now launch the proxy:
node index.js &
When you now access the previous .onion address through the Tor browser, you should now see this website, for instance, this current website: http://ymglrht2hmgdlt66oaztz4zpcuyzf7e773zgndcwz2msjgvkoysr7kid.onion/
In case you wish to stop and restart the proxy, you can do as follow:
# Find the process id using the port 3000
netstat -lpn | grep : '3000'
# Kill the process, replace <Id> with the output of the previous command
kill -9 <Id>
Bonus: use Tor-Location to let the World know about your Hidden Service
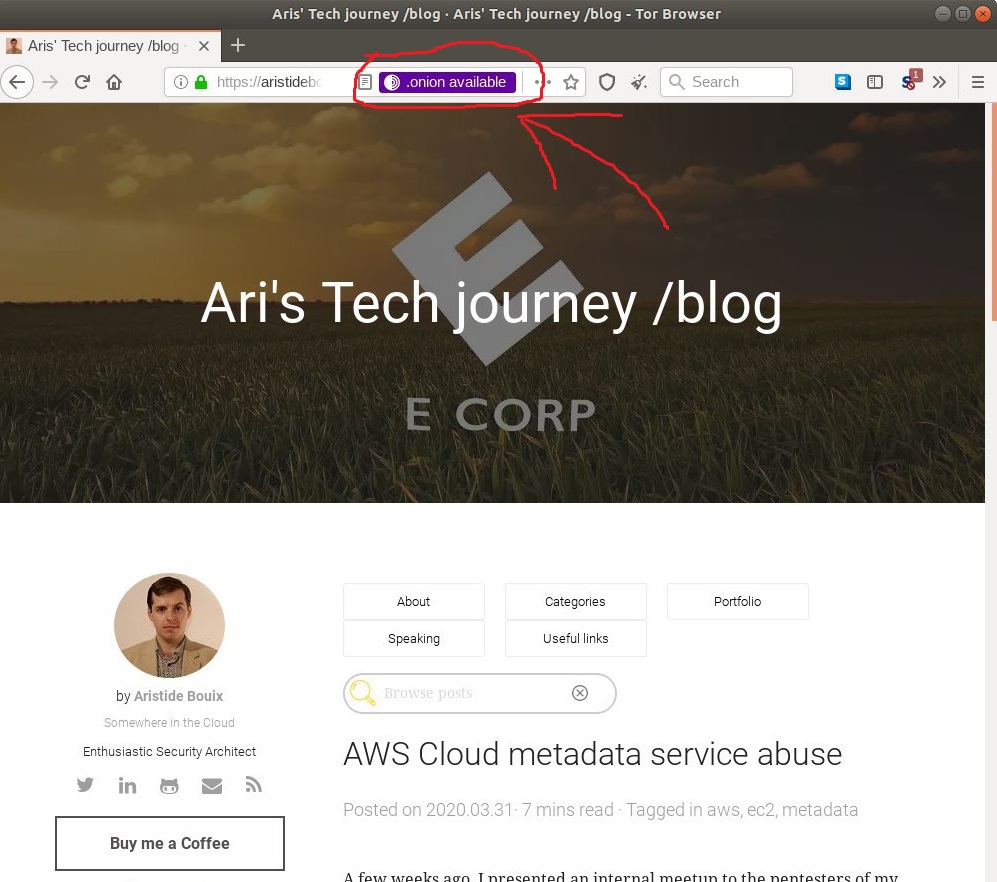
Okido, now you have a Tor version of your site running, but how to let your users using Tor know about it? Well, the Tor project happens to have released a convenient new feature called onion-location:
Nice should implement that https://t.co/dl0pysEIet
— 𝒜𝓇𝒾𝓈 🖋 (@ArisvdZ) June 7, 2020
To summarize, you can either add a meta tag in your website HTML header or return an Onion-Location HTTP reader from your server to let every Tor client accessing your website know the new .onion address. In my specific case, the HTTP response header added to my Lambda@Edge function 4 wasn’t always recognized. Also, I added the following meta tag:
<meta
  http-equiv="onion-location"
  content="http://ymglrht2hmgdlt66oaztz4zpcuyzf7e773zgndcwz2msjgvkoysr7kid.onion/ "
/>
Enjoy!
-
Note you don’t need to configure a Tor Relay for this tutorial ↩︎
-
While I agree in javascript the number of lines is a far more subjective concept than in python ↩︎
-
See this previous publication to know more about it ↩︎
Comments
comments powered by Disqus