Secure your site with Lambda@Edge

|
Let’s now deal with a more enjoyable subject.
In my precedent posts, it was essentially related to Sysadmin aspects, I wrote those articles as I wasn’t able to find any satisfyingly complete reference online, so I’ve decided to write them. However, you probably see in my description corner that I am an Amazon Web Services certified, adept of DevOps and with a strong focus on the security aspects.
As I’ve got freshly, AWS Security Specialty certified, it was high time I approached an AWS security oriented subject; I’m not going to describe how I’ve built and deployed this website, I myself found all the needed information here.
Unfortunately, deploying a good TLS implementation is far less common, also as I was browsing Troy Hunt blog, I fell on his impressive article <em>The 6-Step “Happy Path” to HTTPS</em>.
To resume the 6 steps quickly:
- Get an X509 certificate
- Redirect insecure requests, http to https
- Enable HSTS header
- Change insecure schemed references
- Add the Content-Security-Policy header
- Monitor with Report URI
To do all of the above steps easily, Troy recommends the use of CloudFlare Content Delivery Network (CDN) service, which is an excellent service, but as I’m an AWS Solutions Architect, I wondered if I couldn’t do the same natively in AWS.
1 Get a free certificate for your domain with Amazon Certificate Manager
For this section, I will assume you already have a domain name and an AWS account.
If you haven’t already buy your domain name, I recommend you not to buy it on Route 53 as they’re usually more expensive. I bought mine on Gandi after I read in Route 53 Domain Registration Agreement, that Amazon was actually getting their domain registration service through them. Gandi supports modern MFA authentication, Whoisguard 1 and has regularly good promotions, the con being of course that the cost is dissociated from your AWS bill.
In order to promote web traffic encryption, Amazon gives you a lifetime renewable free public X509 certificate for any of your hosted domain.
To use a domain from a third party Registrar inside of AWS, you need to create a hosted zone in AWS and after change the used domain servers in your DNS Zone file on your Registrar website.
To do so, log in the AWS console, in the service list select Route 53, on the left panel select Hosted Zones, create a new one and name it as the domain name you just bought, the process is pretty straightforward. Alternatively, if you prefer using the AWS command line ( CLI ), click here for official documentation.
The hosted zone will be initially populated with an NS record which gives you the AWS DNS servers to use.
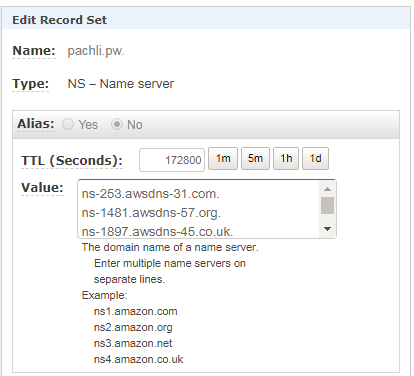
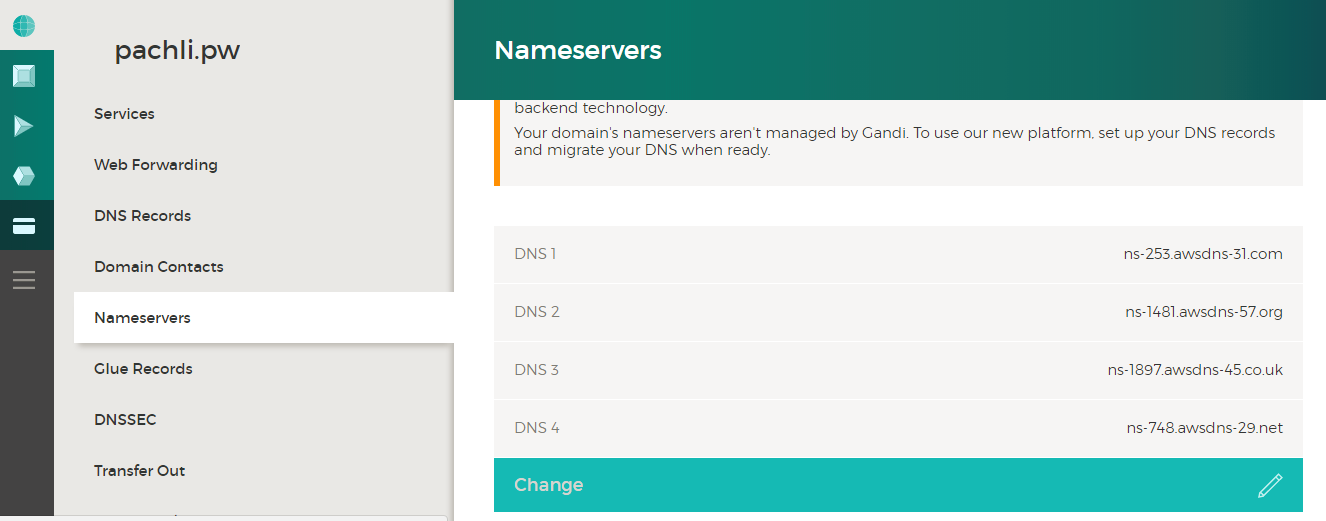
You now have to login to Gandi website, or whatever Registrar you chose 2, and change domain default Name servers to AWS ones.
Now that our domain is managed from AWS, we can generate the corresponding certificate in ACM.
In the AWS console, select Certificate Manager in the service list. Here click on Request Certificate, alternatively, many Registrar as Gandi give you a one year free SSL certificate for your domain, also another possibility is to generate a public certificate on Gandi and import it in AWS, the advantage of doing so is that you will have access to the certificate file itself ( But you will still have to renew it in ACM in one year ).

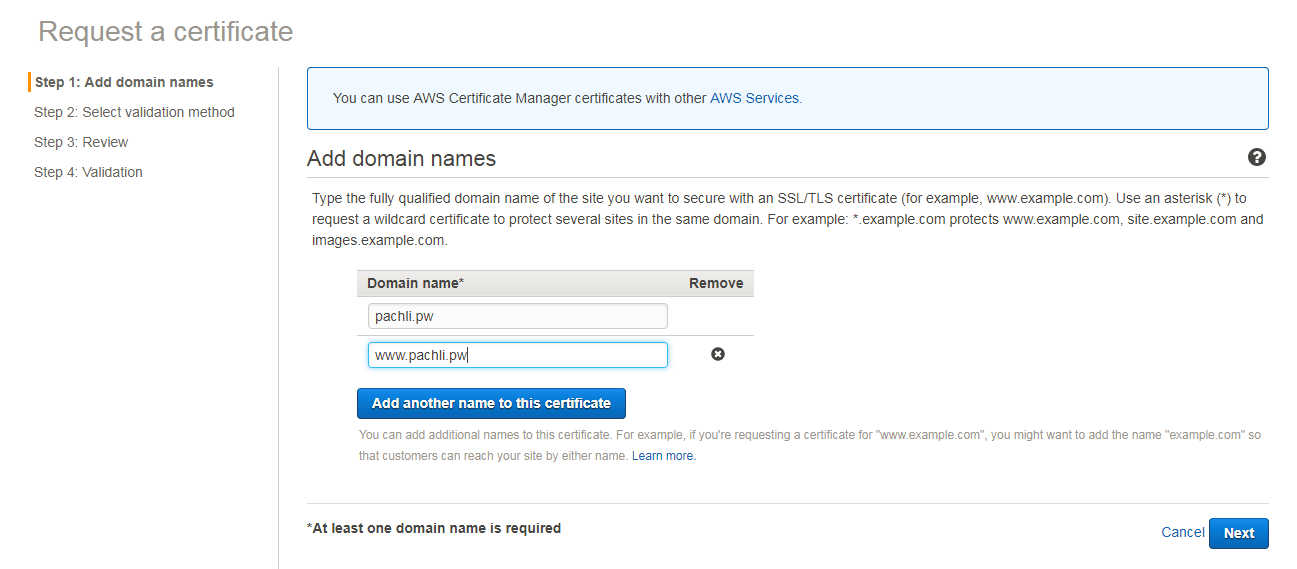
For this tutorial, I will create it in ACM, click on Create certificate and then on public certificate. To complete the certificate registration, you have 4 steps.
First step, enter both your domain name and your www domain name, if you don’t, the latest one won’t be covered by the certificate. Once done, select next.
Second step, select DNS or e-mail validation, I will pick DNS validation, but if you’re using an external Registrar such as Gandi, they probably provide you free email-boxes associated with your domain. Finally, review your order and validate you own the domain by DNS validation.
Amazon will then provide you two CNAM records 3 to insert to your Hosted Zone as a proof you own the domain.
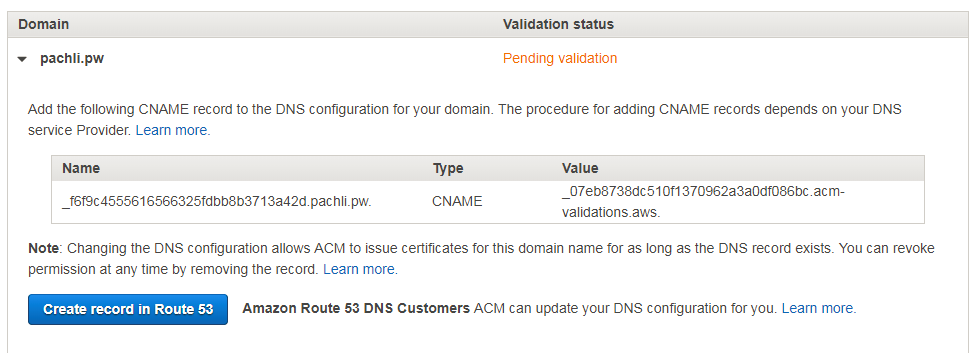
Now create an A and AAAA records to redirect, respectively ipv4 and ipv6, requests from your domain name to your CloudFront distribution and a CNAM record to redirect the www-domain to the canonical one.
Finally, select the certificate in your CloudFront distribution settings:

2 Redirect insecure requests within Cloudfront console
For this step, go to your CloudFront distribution settings and in the Behavior tab, modify the default behavior to redirect HTTP to HTTPS and save.

3 Steps 3 to 5 add HSTS, CSP and other security headers with Lambda@Edge
Even with a certificate, our website is still insecure, for example, images, scripts and external data can still be loaded over http. Let’s used Scott Helme service securityheaders.com to see precisely what we are missing.
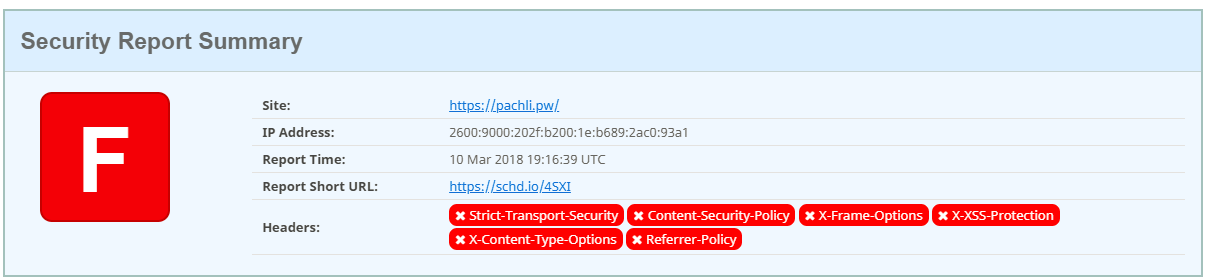
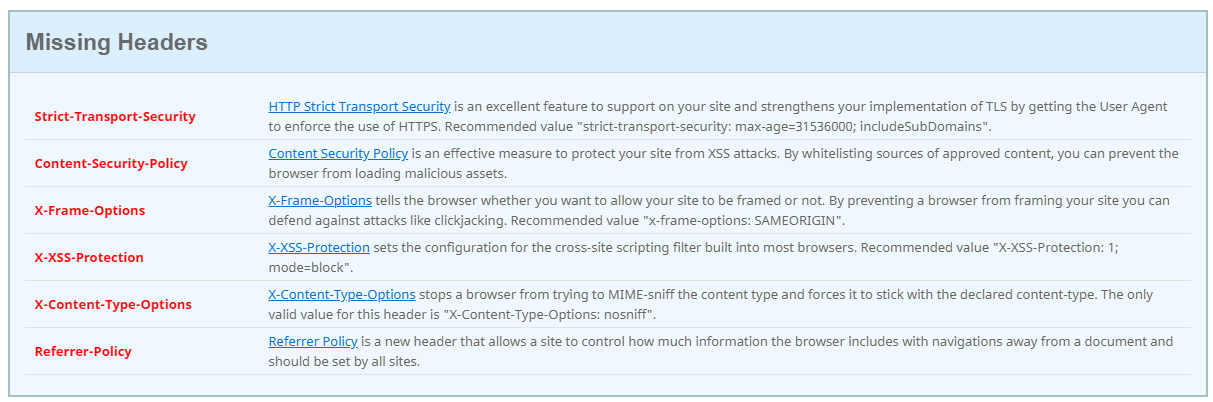
The Missing headers tab give us exactly what we need to add using our Lambda@Edge, it’s now time to introduce what exactly is Lambda@Edge.
As introduced by Jeff Barr last jully, a Lambda@Edge is a small javascript lambda function that you can execute from Cloudfront Edge location to modify web requests On the fly. We’re going to use it to add web response headers, but we can imagine many other use cases as adding an authentication token or resizing images before forwarding, etc…
I wrote “small” because this lambda has a few specific limitations as it cannot use more than 128Mb of memory or take more than 3s to execute, some headers are equally blacklisted by AWS to prevent abuses.
Before programming this CloudFront triggered function, let’s see where it can apply.
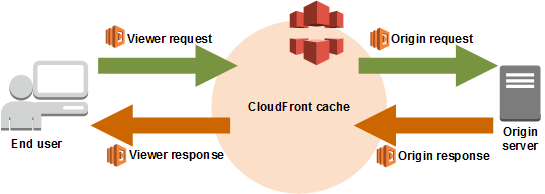
Lambda@Edge can execute on 4 different requests:
- After CloudFront receives a request from a viewer (viewer request)
- Before CloudFront forwards the request to the origin (origin request)
- After CloudFront receives the response from the origin (origin response)
- Before CloudFront forwards the response to the viewer (viewer response)
In our case, we will be interested in the origin response, we could add them in the viewer response, but it’s better to set those headers as soon as possible in the response chain.
Although CloudFront was the first CDN service allowing you to execute code from Edge location, I need to precise here that, following the success of Lambda@Edge, CloudFlare jumped into this market a few weeks ago by introducing CloudFlare Worker.
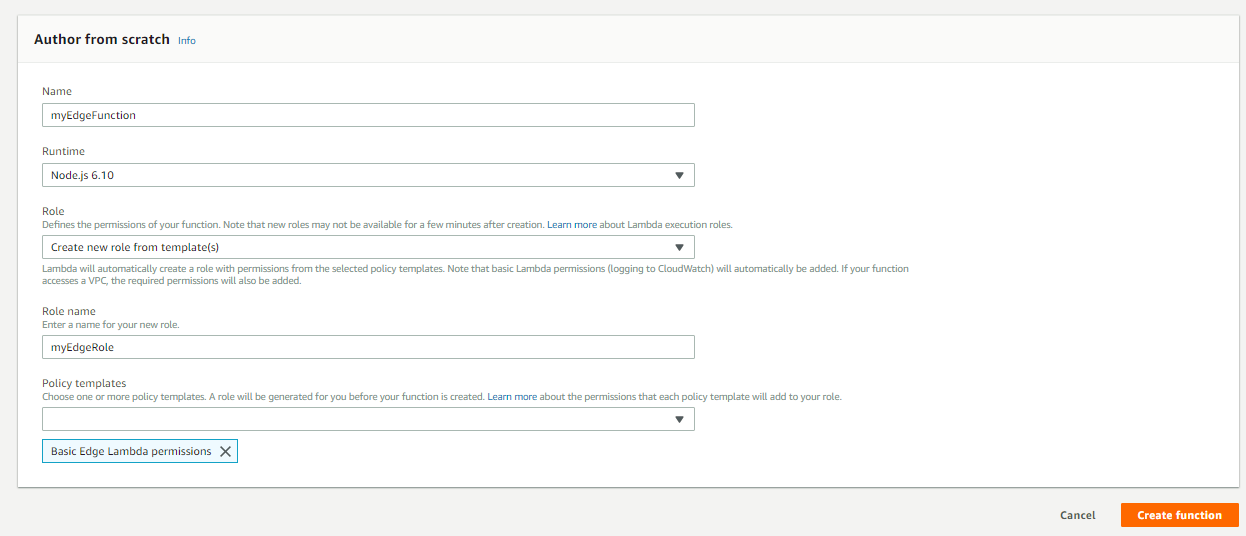
Let’s now head to the AWS lambda service in the console, Lambda@Edge can be configured only in the N.Virginia region ( us-east-1 ), which is AWS main region for administration tasks.
From there, click Create Function you can name it myEdgeFunction for instance, make sure to select NodeJs 6.10 or 8.10, create a new role from template, name it and select Basic Edge Lambda permissions as policy template, as shown below, then click on create.
Now past the following code in the index.js file (Opened in the editor):
'use strict';
exports.handler = (event, context, callback) => {


    //Get contents of response
    const response = event.Records[0].cf.response;
    const headers = response.headers;

    //Set new headers
     headers['strict-transport-security'] = [{key: 'Strict-Transport-Security', value: 'max-age=63072000; includeSubdomains; preload'}];
     headers['content-security-policy'] = [{key: 'Content-Security-Policy', value: "upgrade-insecure-requests"}];
     headers['x-content-type-options'] = [{key: 'X-Content-Type-Options', value: 'nosniff'}];
     headers['x-frame-options'] = [{key: 'X-Frame-Options', value: 'SAMEORIGIN'}];
     headers['x-xss-protection'] = [{key: 'X-XSS-Protection', value: '1; mode=block'}];
     headers['referrer-policy'] = [{key: 'Referrer-Policy', value: 'same-origin'}];

    //Return modified response
    callback(null, response);

};
One last step is to setup the CloudFront trigger, so let’s add it… Oops, it seems something got wrong:
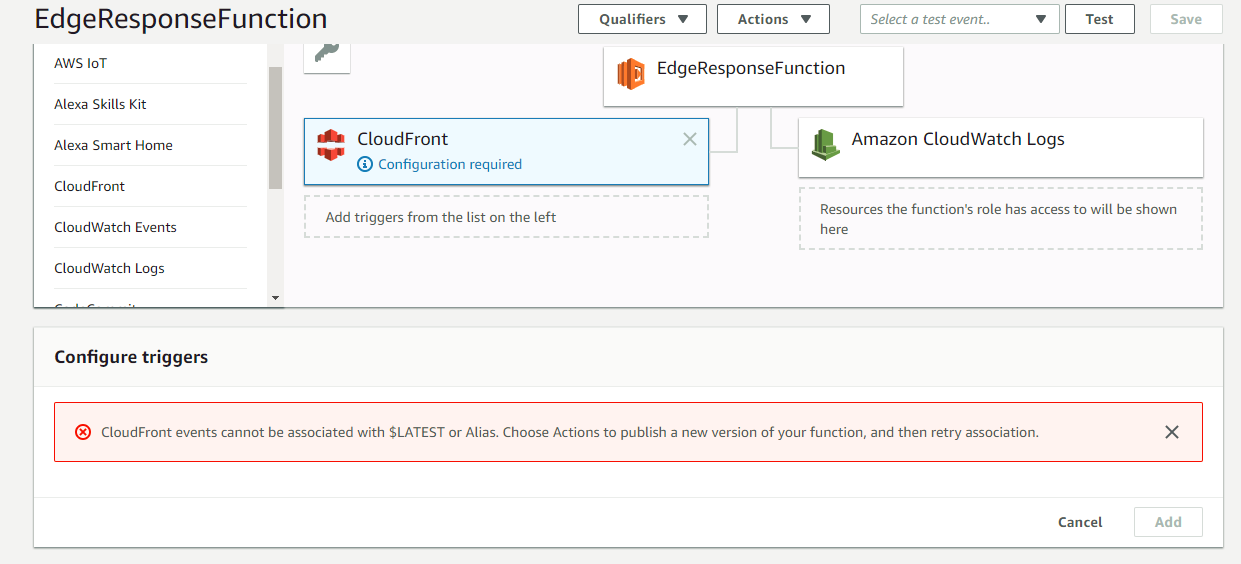
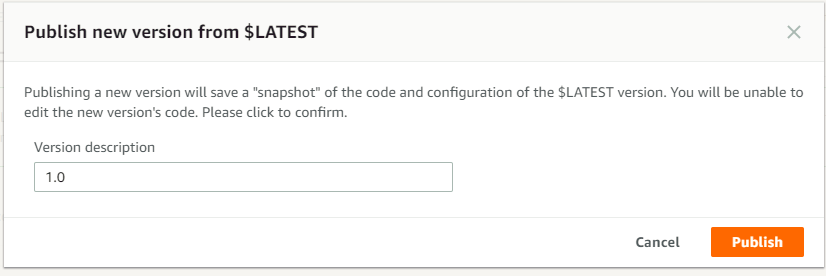
Actually, I’ve figured out you need to publish a new version of your function before being able to deploy it in every Edge location. On the upper part of the Lambda function panel, select Action and then Publish new version, you should now see the below tab opened, enter a version number or name and publish.
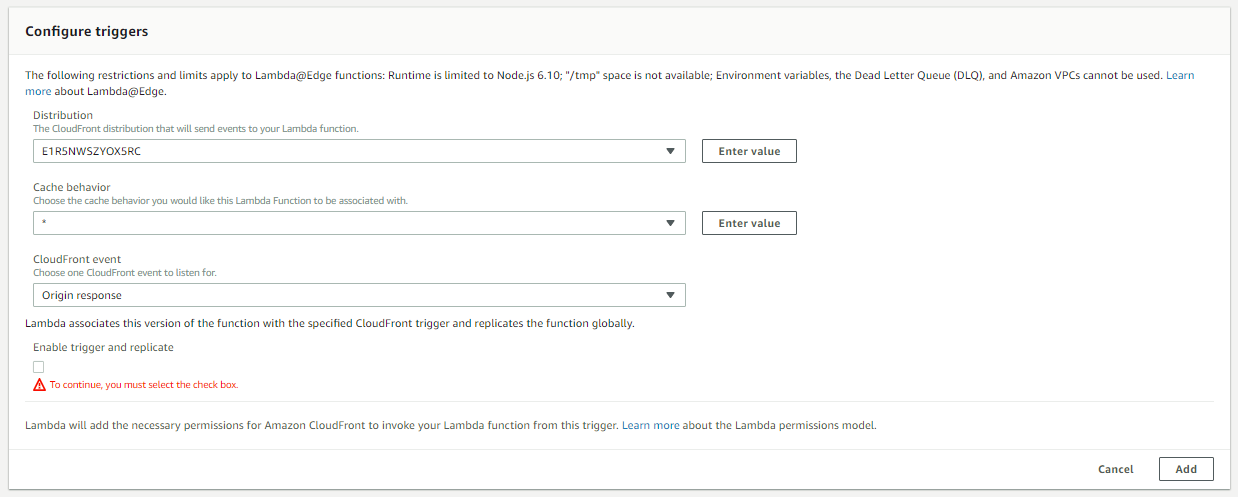
Well, now it works, complete your trigger configuration as I did below and don’t forget to tick the Enable trigger and replicate box, then select Add.
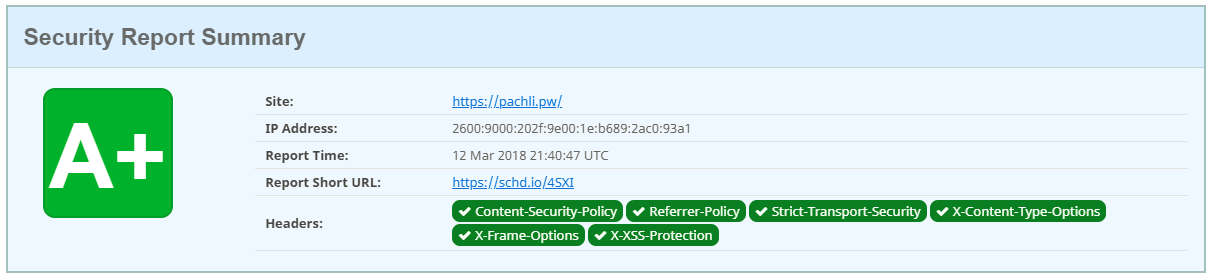
Wait around 10 minutes and your function should be deployed. Now head back to securityheaders.com and we should get a top-notch A+ grade:
In case you wouldn’t get this result, I encourage you to switch to AWS CloudWatch service console, set the region the closest to your location ( or to your proxy/VPN server location 😏 ), and look for any error message. Or you can try to manually trigger your lambda edge function with AWS provided Lambda@Edge sample events 4 to track down error messages directly. Most of the time I bet it will come from a mistyping, but with AWS intensive DevOps, it’s still possible Lambda@Edge way of functioning will highly differ in the future.
4 Monitor with Report URI
Let’s now dive in the last step of this guide. In his article, Troy Hunt recommends us to use Report URI in order to verify if any content tries to bypass our strict https Content Security Policy, however, the service allows us to be far more granular.
First of all, what is Report URI? Report URI is a third service that exploits the reporting capability of modern headers ( for instance CSP ) in order to make browsers which visit your website send reports to bring analytic and trigger alerts in case of abnormal activity such as an XSS redirection attack.
Let’s highlight that the company has been shortlisted for Best Emerging Technology in the SC Awards Europe 2018
Their service may seem a bit abstract, so let’s deep dive in a few recent use cases announced by Scott Helme:
1 XSS Auditor reporting
Announced a month ago, this functionality exploits reporting in the X-Xss-Protection header to alert in case of XSS attempt.
It’s currently a bit buggy on chromium based browsers, but we may hope a larger browser support soon, to enable it replace in the earlier Lambda@Edge function, the line :
headers['x-xss-protection'] = [{key: 'X-XSS-Protection', value: '1; mode=block'}];
by
headers['x-xss-protection'] = [{key: 'X-XSS-Protection', value: '1; mode=block; report=https://{your-report-uri-subdomain}.report-uri.com/r/d/xss/enforce'}];
The https://{your-report-uri-subdomain}.report-uri.com/r/d/xss/enforce can be found in your Report URI account in the Setup panel.
2 The CSP Wizard
This one is a very cool trick, announced earlier this month, it simplifies the CSP reporting to show all of the reported domains in a unified table as shown below:

You can now in a single click sort them in the whitelist or blacklist ( could correspond to an XSS for example) category. In my case, all these domains seem to correspond to my normal scripts, images, and fonts; therefore I’ve decided to whitelist all of them.
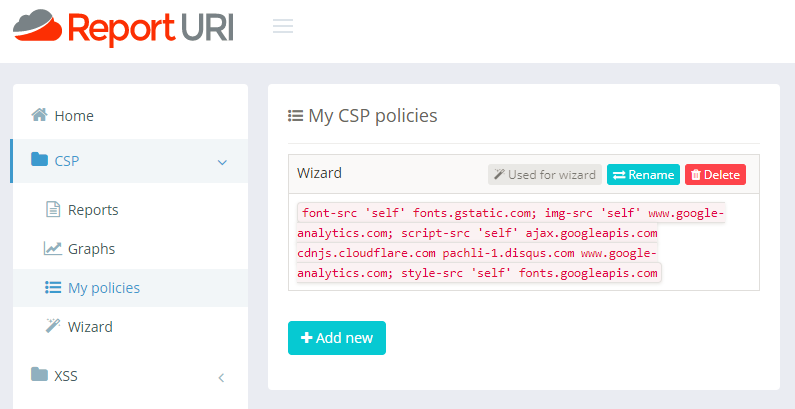
In the policy tab, I now have automatically generated the CSP policy which whitelists all of the usual website sources that I can quietly allow in my Content-Security-Policy-Report-Only header for future reports.
In order to get this policy, we need first to add the following header to the above Lambda@Edge headers list:
headers['content-security-policy-report-only'] = [{key: 'Content-Security-Policy-Report-Only', value: "default-src 'none'; form-action 'none'; frame-ancestors 'none'; report-uri https://{your-report-uri-subdomain}.report-uri.com/r/d/csp/wizard"}];
It corresponds to send a report for any source, form-action or frame-ancestors present on your side. Therefore this header will generate an unusually high number of reports to give you an exhaustive vision of your website relations in the Report URI CSP Wizard tab 5.
I can now modify this header with the policy generated by CSP Wizard to decrease the number of generated reports, which ones I know correspond to my regular website activity.
In my particular case, it will be: (AS IT DOES NOT CORRESPOND TO YOUR WEBSITE ACTIVITY, DON’T USE IT!!)
headers['content-security-policy-report-only'] = [{key: 'Content-Security-Policy-Report-Only', value: "font-src 'self' fonts.gstatic.com; img-src 'self' www.google-analytics.com; script-src 'self' ajax.googleapis.com cdnjs.cloudflare.com pachli-1.disqus.com www.google-analytics.com; style-src 'self' fonts.googleapis.com; report-uri: https://{your-report-uri-subdomain}.report-uri.com/r/d/csp/wizard"}];
Conclusion
With those four steps genuinely described, you now have no excuse for not releasing a platinum grade TLS implementation on your AWS webservers. Although in my case I put the CloudFront distribution in front of a static S3 bucket website, those steps would be the same for a CloudFront distribution in front of an Elastic Load Balancer or an EC2 instance.
The significant advantage of this solution is that it’s 100% server technology agnostic, it works the same as your web server is Nginx/Apache/IIS… based
Good luck young TLS padawan! 👽

-
Replacement of your contact information (phone number, e-mail, and address) with Gandi SAS ones to prevent spam. ↩︎
-
If you use Route 53, you can skip this step. ↩︎
-
One for the domain and one for the www domain name. ↩︎
-
Use the response event sample only, or you will get weird results with missing fields. ↩︎
-
Beware if you do it for several websites, you may reach your Report URI monthly reports limit. Also as it’s a report-only header, no content will be blocked to your users, instead a short report will be sent to the Report URI platform. ↩︎
Comments
comments powered by Disqus