Mining on AWS

|
WARNING: THE METHOD DESCRIBED IN THIS ARTICLE IS ONLY TARGETING PEOPLE WHO HAVE AWS CREDIT TO LOOSE, DON’T USE IT WITH PROFITS IN MIND
Considering cloud instances are usually expensive, and price of cryptocurrencies ( and especially the ones that are still minable with CPU and GPU ) are collapsing lately, most of you must think I’m turning mad. And, indeed, the target of this walkthrough is absolutely NOT BEING PROFITABLE.
Let me now describe my situation. When you’re working as a consultant, you often grab some AWS credits directly from AWS or its Partners, for instance, to review or try a service or to watch a specific webinar, but once activated those free credits often expire within a few months. As my AWS consumption is usually around $10 per month, when I get a $100 coupon, I usually barely use half before it expires, even while testing tons of new services. As a result, the best way for me to quickly consume all this free credit before expiration while getting a small amount back is to set-up a Linux AMI with Nvidia drivers and run a small mining fleet in an Auto Scaling group.
As I wrote above, doing so is fundamentally not profitable, however before detailing the set-up, I will spend a bit of time on the theoretical aspect of how to increase your profitability slightly by choosing: the right region, the right instance type and the right coin.
The Right Region
As you clearly won’t reserve your instance(s) for a year and the minimum reservation is usually 12 months, odds are to bet you will use on-demand instances. Spot instances could be an excellent choice to increase your profit as you can easily get them 50% cheaper than regular price, however as they can be automatically shut down if someone bid a higher price, it will make the calculation process more tedious and prices vary highly according to the Availability Zone 1 , be careful.
Instance prices are usually proportional inside of the same region, and often, the longer time the AWS region is available, the cheaper it is. This is logic as AWS had more time to make the Infrastructure installation profitable.
Another aspect you should take into account is the location of the mining pool2 you’re going to use, the better the latency, the more profit you get.
Mining pools are most of the time located in East America, Western Europe or China.
On an AWS EC2 pricing point of view, Asia is the least attractive location and America the best, so here my top three AWS regions to launch your fleet 3:
- us-east-1 ( North Virginia )
- us-east-2 ( Ohio )
- eu-west-1 ( Ireland )
For the rest of this tutorial, I will use the us-east-1 region as a reference.
The Right Instance type
Now some history, initially Bitcoin was aimed to be mined by everyone through a CPU ( Central Processing Unit ), later people discovered that they could get more calculation power by using their GPU ( Graphics Processing Unit ). As Bitcoin became more expensive, some people began to develop dedicated hardware called ASIC (Application-Specific Integrated Circuit) optimized to solve a problem related to the Bitcoin-specific algorithm, which is SHA256 4. Usually, it seems established to be more difficult to conceive an ASIC when the algorithm is memory intensive although some developer teams consider no algorithm could ever be ASIC resistant, while other teams decided to hard fork their blockchain client every six months to prevent any ASIC being released. Simply put, once an algorithm is mined by ASIC, GPU profitability falls and although there is a lot of speculation lately about FPGA ( Field Programmable Gate-Array ), that could be configured to have both the adaptability of a GPU and the computing power of an ASIC, I’m not even sure AWS f type instances could be set for this purpose so it won’t be the subject of this article.
As CPU mining is the least profitable and ASIC instances are obviously not provided by AWS, let’s review quickly their different available GPU instances.
For NVIDIA GPU mining 5, the most important is the number of CUDA cores and the Memory clock frequency, furthermore for ASIC resilient algorithms it’s recommended to have at least 4Gb of RAM per GPU, although 6Gb is becoming more recommended.
| CUDA Cores | default CPU clock (in MHz) | default Memory clock (in MHz) | RAM (in Gb) | Hourly price | |
|---|---|---|---|---|---|
| g3.4xlarge (Tesla M60) | 2048 | 899 to 1178 | 2505 | 8 | $1.14 |
| g2.2xlarge (NVIDIA GRID K520) | 1536 | 800 to 1090 | 1502 | 4 | $0.65 |
| p3.2xlarge (Tesla V100) | 5120 | 1245 to 1380 | 877 | 16 | $3.06 |
| p2.xlarge (NVIDIA K80) | 2496 | 562 to 875 | 2500 | 16 | $0.90 |
Taking the result of the previous table, I wouldn't counsel you the p3 type for mining as it has a very low memory clock. The g2 instance is the cheapest but are on the way of being decommisionned and because of the limited amount of RAM per GPU, you won't be able to mine on all the available algorithm.
My recommendation is to privileged the g2 type while it’s available and if it doesn’t work to compare the performance between the g3 and p2 instance type.
The Right Coin
To choose a coin with the maximal ROI 6, I recommend you to have a look at whattomine.com while keeping in mind the following table which represents retail NVIDIA cards performances.
| CUDA Cores | default CPU clock (in MHz) | default Memory clock (in MHz) | RAM (in Gb) | |
|---|---|---|---|---|
| NVIDIA GTX1080 Ti | 3584 | 1582 | 2060 | 11 |
| NVIDIA GTX1080 | 2560 | 1607 to 1733 | 2060 | 8 |
| NVIDIA GTX1070 | 1920 | 1506 to 1683 | 2100 | 8 |
| NVIDIA GTX1060 | 1280 | 1506 to 1706 | 2002 | 6 |
| NVIDIA GTX1050 Ti | 768 | 1290 to 1392 | 1974 | 4 |
As you can see, all retailing NVIDIA GPU have similar stock memory clock, which is not abnormal as the most important clock for gaming is the card CPU core clock, not the memory one. Although in online forum several GPU owners claim they can easily overclock their memory at +1000MHz, on my home computer I use only AMD GPU and usually I overclock the memory at +200MHz, so I couldn't tell if overclocking at +1000MHz an NVIDIA GPU is a good idea.
If you compare solely to the number of CUDA Core, we could tell that the p2 instance type is equivalent to a GTX 1080, the g3 instance to a GTX 1070 and the g2 instance to a GTX 1060. You can base on those references to have a first idea of your mining income. Let’s consider we launch three g3.8xlarge which could be consider as \(3 \times 2 = 6\) GPU GTX 1070. If you go to whattomine.com, select 6 GPU GTX 1070 while setting the electricity price at 0, I see the most profitable cryptocurrency is Bitcoin Gold, the third fork of the main cryptocurrency Bitcoin that happened the 12 November 2017. This Bitcoin fork has the particularity of being Asics resilient and as such can bring me $3.85 a day at the time of writing this article.
As a result, considering we will mine a full day at an hourly price of $1.14 per CPU, it means we can recover $3.85 with \( $1.14 \times 24 \times 6 = $164 \) if using On-demand instances, I told you it’s really not profitable. Eventually with a bid of $0.24 on spot instances you could end up with a bill of $34.56 but nothing guaranty your instance would run 24h in a row, so don’t launch them 24h before the expiration of your credit and regularly monitor, for example, by sending you an SMS or email message when your instances are started and shut down using a combination of AWS CloudWatch and SNS.
Let’s create an AMI
I’m now going to give you the list of commands to be executed to configure your mining AMI, I will use an Ubuntu instance, but you can use any distribution you prefer using a supported packet manager ( Although I wouldn’t recommend RedHat as you would have to pay the licence, same for any Windows version ).
I will consider you have already created your AWS account and set-up your credit card information, then select the EC2 service and request an increase of your EC2 limit, by default AWS don’t let you run any graphics instance so you’ll have to ask for some, which can take up to 48 hours.

To create the AMI, launch any small GPU instance, for instance in AMI I will select Ubuntu server and in type g2.2xlarge. In instance detail, you can choose if you want to use a spot instance and the VPC/subnet location. If you don’t know what a VPC and subnet are, just let default ones. In the add storage section, change the volume size to 20 Gb. You can skip the tag section, and in security group create a new one you will name mine-sg and add a description you like, for security reason I recommend you restrict the Source on My IP.
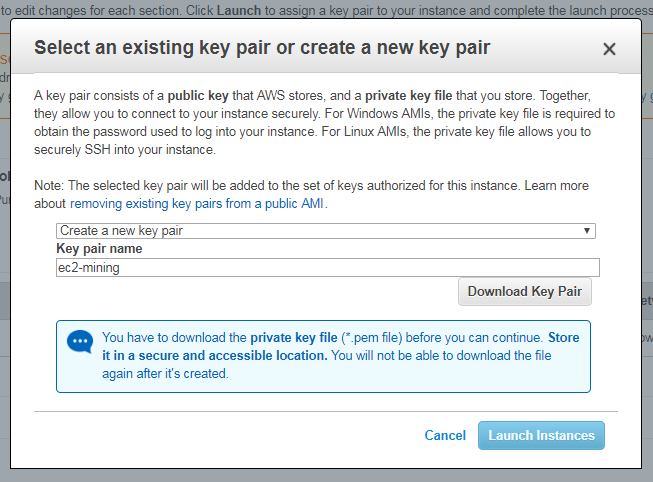
Finally, review and launch your instance, AWS will ask you to select an SSH key pair, select "Create a new key pair", call it ec2-mining download the .pem file and launch your instance.
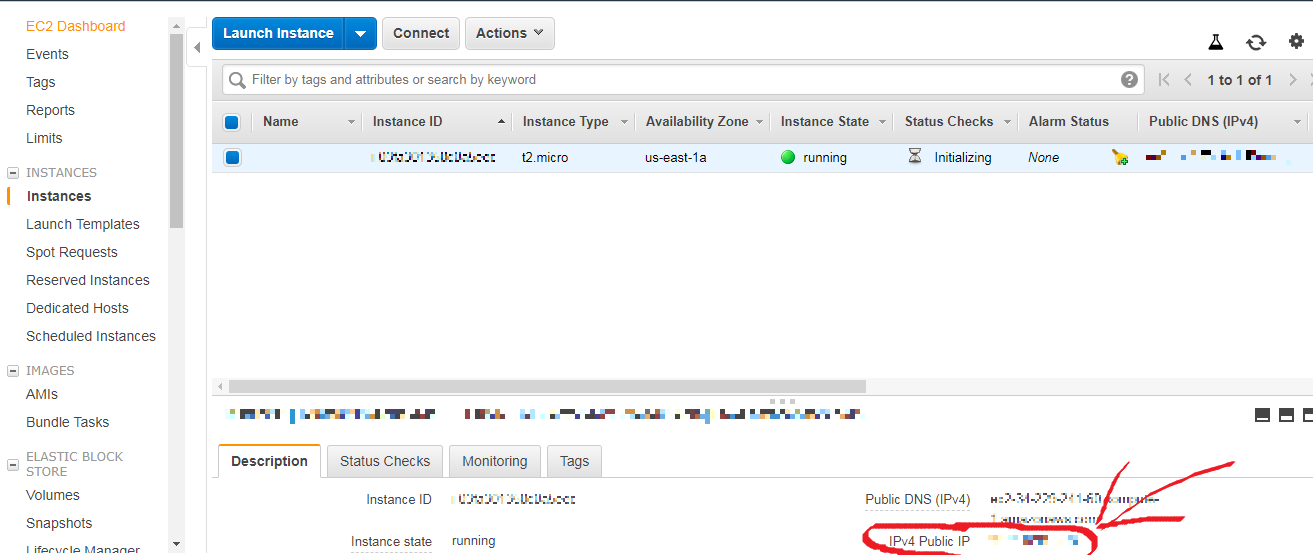
I will consider you know how to access an ssh server from an ssh client with an access key. If you’re on Windows and use Putty, you will have to convert your .pem key file to Putty .ppk format here a tutorial. You can find the public IP of your instance below when you select it in the instance tab.
First, we will update our instance, install the required dependencies and reboot the instance.
sudo apt-get update
sudo apt-get install linux-generic libcurl4-openssl-dev
sudo reboot
Now go on NVIDIA website and get the link to the latest version.

Follow website instructions to install the driver:
wget "http://developer.download.nvidia.com/compute/cuda/repos/ubuntu1604/x86_64/cuda-repo-ubuntu1604_9.2.148-1_amd64.deb"
sudo dpkg -i cuda-repo-ubuntu1604_9.2.148-1_amd64.deb
sudo apt-key adv --fetch-keys http://developer.download.nvidia.com/compute/cuda/repos/ubuntu1604/x86_64/7fa2af80.pub
sudo rm -rf cuda-repo-ubuntu1604-9-0-local_9.0.176-1_amd64-deb
sudo apt-get update
sudo apt-get install cuda
Once done you should be able to see your driver version by entering lspci -v | grep -i nvidia, if you want to make sure the driver is installed for every GPU of your instance, you can write lshw -c video and make sure at Configuration you have something as driver=nvidia, if you don’t see it, you may have to reboot your instance.
You now have to choose a miner software, there are hundreds of different available software closed and open source. If you want an open source one, you often have to compile it yourself, here a tutorial for ccminer on Windows 7. Well, it often happens that close source miners get a higher hash rate and provide more profit than open ones; as a result, I’ve decided to trust and download the EWBF Cuda Equihash Miner binary from Mega.
You should have downloaded 7 a file called EWBF_Equihash_miner_v0.x.tar.gz, uncompress it, delete the archive and make the binary executable:
tar xzvf EWBF_Equihash_miner_v0.x.tar.gz
rm -rf EWBF_Equihash_miner_v0.x.tar.gz
cd EWBF_Equihash_miner_v0.x
sudo chmod u+s miner
Now let’s configure the mining script, you can find instructions on the miner bitcointalk page, as we need to choose a pool I’ve chosen miningpoolhub. With this pool, you need to create an account before being able to mine, once it’s done, you simply need to enter your username and a miner name to begin mining ( And don’t forget the shebang at the beginning of the script ). Optionally you can already set a public Bitcoin Gold address to get the payout of what you mine and for security reasons, set-up a Google Authenticator OTP as well as registering your miner name with a password. In my case, if my username is Khrakovi and I want to call my miner iswag, I will have to write the following script in a file you can call mine.sh :
#!/bin/sh

./miner --algo 144_5 --pers BgoldPoW --server us-east.equihash-hub.miningpoolhub.com --port 20595 --user Krakhovi.iswag --pass x
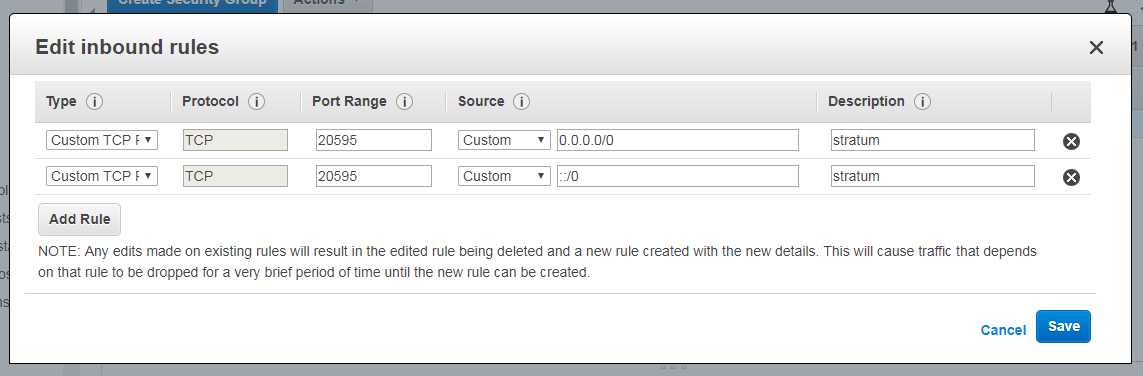
As you can see, you need to open port 20595 in inbound of the security group written previously, report to the documentation if you don’t know how to do it. Delete the previous SSH rule which isn’t useful anymore so that your security group inbound rules look like the following screenshot:
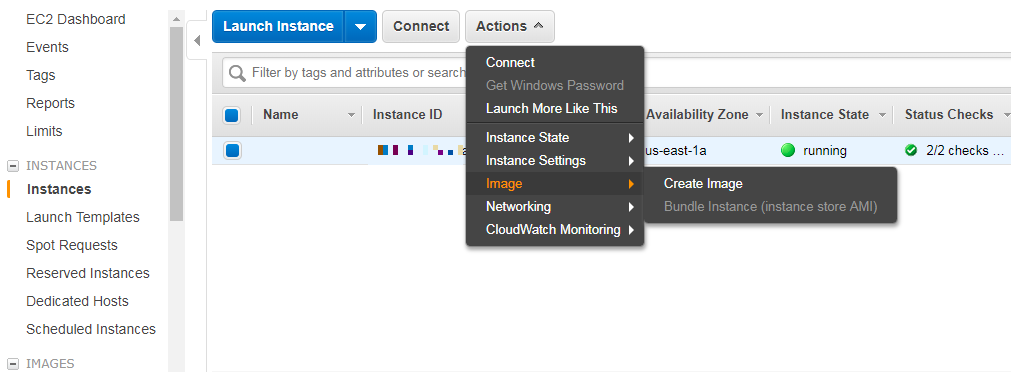
Now package your AMI from the running instance, give it a name and terminate the instance once done ( the AMI creation can take up to 10 minutes ).
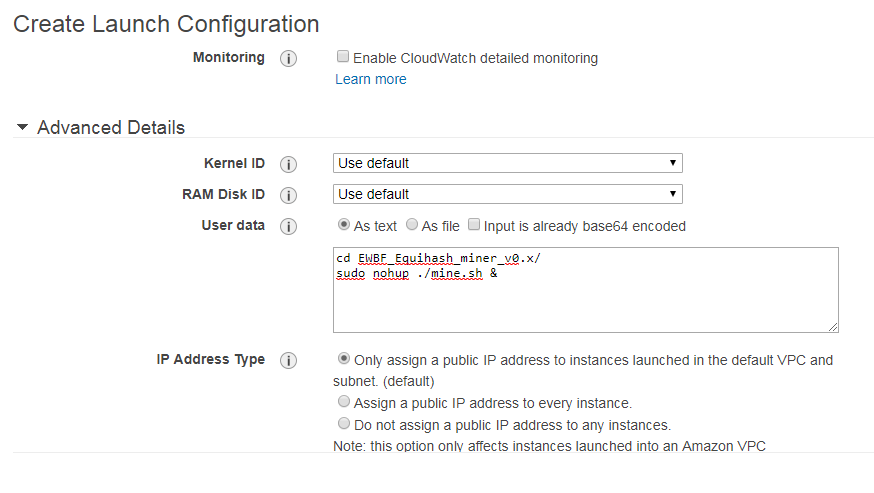
Finally, you can launch several instances based on this AMI individually or create a Launch Configuration and Scaling Group to deploy several at the same time. You will just have to write the two following lines in the User Data to trigger the mining script:
cd /home/ubuntu/EWBF_Equihash_miner_v0.x/
sudo nohup ./mine.sh &
You can monitor your miner(s) performance on the pool dashboard, once you’re done with mining delete all the corresponding instances and attached volumes to prevent any additional charge.
Enjoy!
-
Which is a distinct DataCenter inside of a same region. ↩︎
-
As mining became a popular activity with some huge players involved, you usually cannot hope mining a block from a popular coin alone with a single computer. A mining pool is a way for multiple machines to work in collaboration when a block is mined, the earned coins are distributed across participants proportionally to their contribution in term of calculation power. ↩︎
-
Note that Ireland is slightly more expensive, that’s the price for staying in Europe 😏. ↩︎
-
Mining is actually a reward for solving a mathematics challenge based on a cryptographic algorithm. ↩︎
-
All GPU used by AWS are NVIDIA based ↩︎
-
Return On Investment ↩︎
-
To download the file on my instance, I temporarely place it in an S3 bucket and make it public so that I can directly download it through an URL ↩︎
Comments
comments powered by Disqus